Thursday 29 March 2007

Scratchbuilding tip: Tow Cable

(versión en Español)

If there is a piece from GW I do not like at all, it's the tow cable from the Imperial vehicle accesory sprue.


Here it is a simple way to do your own realistic tow cables, and in nearly no time.

You'll need copper or other metallic wire. I have been so lucky to have access to a power cable with fairly thick copper strands.

I take five copper strands from the cable.

I twist one end with a plier.

I'll use a chuck to clamp the other end.

I will use my trusty low speed IXO to twist the copper wires.

I firmly hold the free end with the pliers.

And start twisting the wires.

I stop once I feel the cable is twisted enough.

I cut the ends...

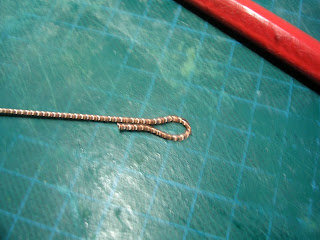
Now I make a loop at the ends.

Like this:

Now I take a lenght of cable plastic cover.

And cut it lenghtwise by half.

I put one half inside the loop, cutting the excess.

Now I glue it with cyanocrilate.

I use more copper wire to close the loop.

The finished loop. You can wrap the wire we have added now with a tin strip if you want a better finishing.

The finished cable.

This is how it looks once it is glued on the model.

Sunday 25 March 2007

Painting and Weathering Tutorial: Part II

(versión en Español)

PART I
PART II
PART III
PART IV


Well, time to start working again on the rusty Vanquisher!


I was looking for very big numbers on the turret, but as I did not have any suitable decals in my spare box, I decided to use a mask to paint them on.

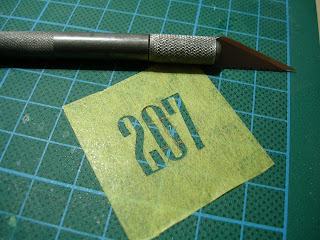
After choosing the font I liked (Niagara), I printed it backwards using Corel Draw and a laser printer. If you don't have access to a laser printer, just use an inkjet and then do a photocopy. The trick here is using toner, ink will not work for our purposes.

I then put some Tamiya Masking Tape on the table and using more masking tape, fixed the number "207" over it.

I press the number now with a bit of paper soaked in a little acetone.

The toner is inmediately transferred to the masking tape.

I put a new blade in my cutter and carefully cut away the numbers. I do this twice.

Note that I leaved some bits to hold the inside of the "0".

I fix the mask to the turret, pressing with a blunt tool.

And prepare a mix of Tamiya XF7 Flat Red paint for my airbrush.

I airbrush red paint at low pressure, allowing it to dry between layers.

Finished.

Now I'll retouch the numbers with a brush and red and white paint.

The model has a lot more of character now.

Time for an oil wash. I'll normally use a mix of dark brown and black, but being the model is white I feel that the dark brown will be enough. I do a mix of about 80% thinner, 20% Burnt Umber oil paint.

You'll notice that it is enough to apply the point of the brush on a crack for the mix to freely flow by capillary action. Washes based on mineral spirits (both oils and enamels) are way better than their acrylic counterpart. Just remember that the wash must be controlled, overflowing the entire model with the tinted thinner will not give you a good result.

We let the oil dry for some minutes.

And then we'll remove the excess with a soft brush and a little clean thinner..

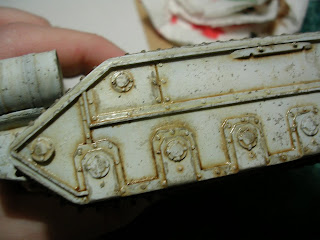
We are going to give another weathering touch to the model drybrushing it. However, the drybrushing here is not used to make lighter areas, it's just to show more tear and wear.

Enamels are great for drybrushing, they give you a lot of working time before drying. I prepare a dark gray-green mix for this part. I use here Revell #66 and a little of Humbrol #33.

Dry the brush a little with some tissue.

And start softly drybrushing the model.

I look for the effect of older paint showing on worn areas.

I concentrate on rivets, corners and places where the crew would stand when accessing the vehicle.

I am now going to add some depth to the model. I'll use Vallejo Model Color White paint for this.

I am going to paint a fine white line below any chipped paint areas to give them more volume. I also make some mapping* areas on places that I find they are too dark. I just put some paint in a random way, showing the colour below. The effect is very exaggerated, but I'll disguise it later on.

*Mapping is a technique I'll show you in other tutorial.

This is the area before the white lining.

And after. At this distance the effect is too evident, but we'll soft it a little later on the final stages.

I did use here some mapping and some lining.

The idea is to make the area visually interesting.

Another view...

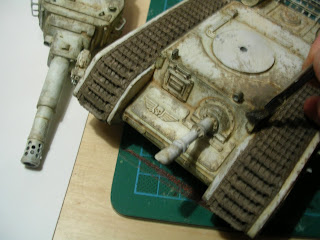
I am now going to do some rust in the sides. As this Ragnarok-Vanquisher had lost its track covers, those two areas should be rusted as it happens in real life after some time.

I mask the area...

...And do a rust coloured mix done vith Vallejo Panzer Aces 301 Light Rust and 302 Dark Rust.

I also do a crude mask ripping a piece of cardboard (Notice the mapped surface showing)

I airbrush the rust base, moving a little the cardboard mask during the process.

This is a pure graphite stick.

I use it to paint over those surfaces that are so worn out that the bare metal is showing. I use also my finger to blend it a little. I find that graphite gives a very subtle metal finish.

Now I am going to add more rust with Humbrol #62.

I paint the enamel on some recesses (it it's important not to overdo it).

You could also make some rust marks.

Once you are done, you let the enamel paint dry for a few minutes.

And then you use a soft brush and thinner to blend it over the surroundings.

Now the tank has more chromatic depth.


Next time we'll finish the rusted areas and start working on the threads.

NEXT