(versión en Español)
That was to be my entry at the Lt. Walke's WIP contest. Unfortunately, Real Life issues prevented me to finish on time. Not that this represents a problem for me, as I can now concentrate on the kind of detailing I prefer.
When Lt. Walke asked for support vehicles, I immediately thought on the DKOK and their bias to large maze-like trench systems. I thought that being this the future, and with all those techpriests and engineseers to help, they would have probably developed an autonomous trench-digging engine.
As it was to be set on 40K, it's clear that it would have to had some characteristics like hugeness, "clankyness", armor and firepower (being 40K I imagine that the grim Korps would dig their trenches in the middle of heavy assaults from hordes of xenos, making some last stands on their way and so)(and THIS is exactly what I really like of Warhammer 40000, mates...).
Having said that, I picked a really old and bad industrial scraper kit a bought for 5€ ages ago (I knew I would someday use it, BWAHAHAHA!) and recycled the bucket for my sacred and revered engine of construction.
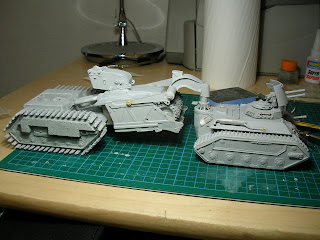
I used chimera sides for the digging part and resin sides for my Ragnarok-like set. The hulls are scratchbuilt from plasticard, throwing some styrene parts from bargain 1/35 kits I hunted on eBay. As some fellow WIP pointed me, the chimera tracks looked too small and close to the sides of the freshly dug trench, so I added some extra pieces to add a winterketten-like feeling to the rear part.
The most interesting thing is that, incidentally, the front part works really well by itself, so I am planning to make some magnetized add-ons to use it as an independent engineers vehicle.
This is still a WIP, thought, a lot of work remains to be done on the rear part.


