
A space to share modelling techniques on many subjects. While mainly centered upon scratchbuilding Warhammer 40K vehicles, you will also find the occasional WWII model.
Well, I suppose I should update my work on the Malcador, which in fact is progressing steadily. However, as I am currently enjoying some free days, I immediately switched to another project I had in mind (you know how it is, fellow modelers...), during the few spare minutes that the Stalker game is leaving me those days, leaving the Malcador temporally aside.
The Manticore missile system is a very interesting vehicle I wanted to make for a long time. In any case, I wanted to build something different to the canonic FW Manticore (I mean, not using that chimera hull again and again), so I glued a spare set of tracks I had lying around to a Ragnarok hull and started working on the antenna set.
I tried to obtain a russian-flavoured vehicle, sporting a huge antenna array to direct those Manticore rockets to their unaverted targets, so I scratchbuilt a large receiver antenna with some evergreen strips and placed an emitter dome at the front.
Rockets will be added later from the Hasegawa 1:48 weapon set (probably the Phoenix missile system, although I am hesitating to use a lower tech-like candidate from the same kit, like the GBU-24 Paveway III).
I added some pics from the progress so far…
The Malcador is a vehicle which fascinated me from the very moment Forgeworld released it. It’s lines are so WWI that I immediately imagined it on a mud-and-razor-wire trench scenario.
I wanted to scratch build one of them, but this time I though about a little vignette in which I could display the tank pondering though razor wire and concrete defenses.
I finally decided to display it shot down (this is the good thing about scratchbuilding things, you do not need to put any constraint on your model). This Malcador was shot down by enemy fire, ammo exploded making the riveted joints to break away.
I have progressed on the right side so far… More to come.
Once I finished my entry last week I noticed that I could have made a little tutorial about working with snow.
As the diorama was far from being complete, I took advantage of next stages to take some pictures (I also used my wife’s brand new camera, which is actually so complex that it only lets you to push the big button and does everything by itself).
I use the traditional snow recipe used for ages by many modelers: bicarbonate and PVA.
You will need water, PVA glue, bicarbonate and gloss acrylic varnish (I used Future here, but you can use the one you prefer).
I mixed equal parts of PVA and water, added a generous quantity of gloss varnish and then added more and more bicarbonate until the mix gets a slurry consistence.
I also water down some of the original mix in another container.
Once I get the right consistency, I carefully pour the thicker mix on the diorama.

Even though, you will need to shape it with a flat tool.
I used the watered down mix to soften the edges with a large brush.
I prepared a even more watered mix –adding a bit more of gloss varnish- to represent snow and ice which got into recesses (like the thread marks on the ground).
I start applying it to the tank (you need to do this in many stages, allowing the mix to dry between them in order to not overdo it).
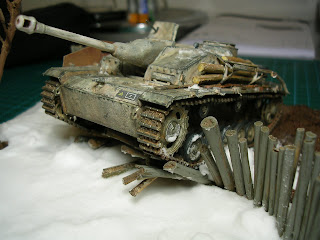
And this is the result for the moment being. As you see is quite easy to do and a lot of fun. Once it is dry, you need to seal the bicarbonate with gloss varnish. This will give it the right satin finish and seal it to avoid it to get yellow tones over time.


 The dirt is done mixing plaster, MIG pigments, PVA and some sand. Snow is done by mixing bicarbonate, PVA, water and gloss varnish until the mix is quite slushy. I poured it and flattened it with the help of a palette.